Before we talk about the jaw-centering techniques, let's talk about why you want to center your jaw. Especially if you are concerned about asymmetrical face or jaw pain or such kind of jaw-related issues, you should keep reading.The main cause of any asymmetry, such that one is higher than the other, one eye is slightly bigger than the other, one eyebrow is higher than the other, one cheek is more out than the other, and any asymmetrical facial features come from your jaw. Even if you think it’s not related to the jaw, it is. Your face depends on the jaw.
The jaw is the biggest bone among the other facial bone panels. Although there are many bone panels on the skull, the jaw does the most dramatic move in our regular facial activities. The dramatic moves of the jaw include speaking, eating, yawning, drinking, and a lot of things. Every time you do those activities, the jaw moves a lot, although the other bones don’t move much. So the jaw move is the biggest one. That's why if you are moving the jaw in an asymmetrical way, the jaw position becomes asymmetrical, which leads to asymmetrical positions of the other bones connected with the jaw, Including the eye or forehead.
Even if you're not concerned about an asymmetrical face, if you are concerned about jaw pain, it means the same. Your jaw is asymmetrical enough to cause such pain. Although everyone is supposed to be asymmetrical to some extent, the asymmetry level is high enough to cause the issues. That's why you get pain here. That is why it's so important to care for our jaw and how to center it.
Jaw Centering Technique #1
This is a new technique that I learned from Dr. Mona, who is a dentist and also did our instructor certification course. So she knows about face yoga and dental.
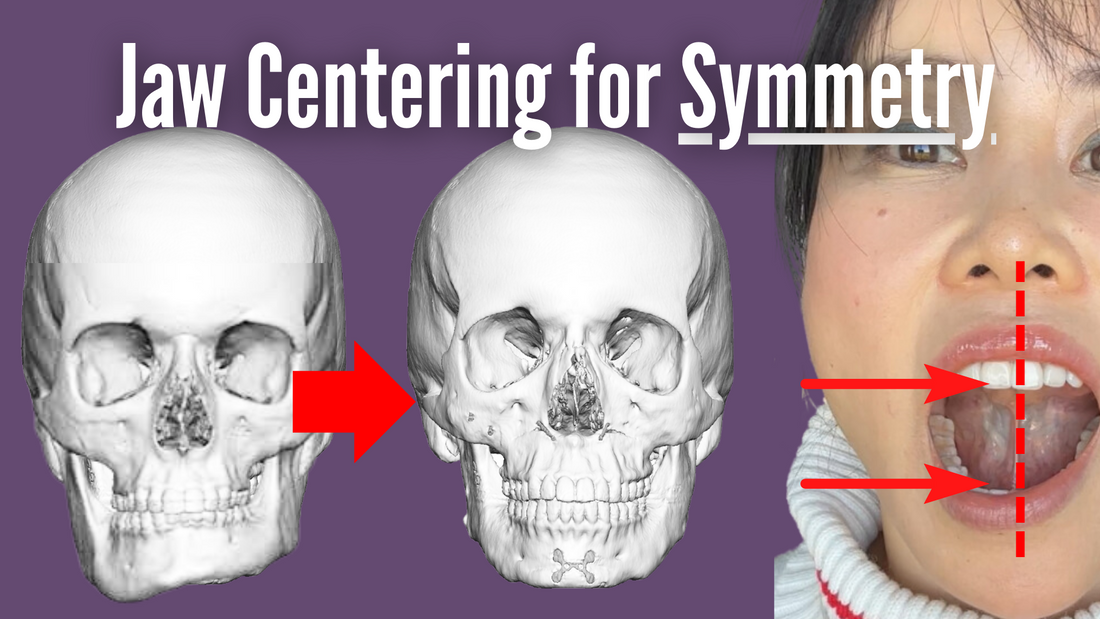
- There is a midline on the upper teeth.
- Then you have another midline in the lower teeth.
- When you mew (Mewing 101), you will see a line on the back of the tongue.
- Keep the line straight between the upper and lower midlines.
- Stroke the tip of the tongue back and forth slowly while keeping the line straight between both midlines. Keep mewing during the repetitions.
- You can try 3-5 reps slowly. The slower, the more effective.
In my case, the left is my dominant side, so the tongue tends to be toward the left. So I need to be careful. If I do too quickly, I won’t notice that.
Jaw Centering Technique #2
This is a part of the self-facial chiropractic or face adjustment technique. You need to first know which jaw is dominant. If you don't know which side of your jaw is dominant, please check our Face Adjustment course to identify which one it is otherwise, it doesn't make sense to do this exercise. In my case, mine is the left, so I want to move the jaw back from the left to the right. Inhale slowly, then exhale while shifting the jaw. In my case, my right cheek is coming out a bit, so I'm going to press the right cheek in as well. Repeat only 3 times per one time X multiple times/day. It might be easier if you do #2 first and then #1, depending on the face.
Jaw Centering Technique #3
The jaw movement is mainly controlled by masseter muscles (red in the anatomy). Because this is one of the biggest muscles in the face, and because either side is supposed to be dominant, our face becomes asymmetrical. In other words, we are supposed to be asymmetrical to some extent.
- Life up one cheek up and as a result of the lift up, the other cheek especially masseter muscles is being stretched.
- Keep it a few seconds.
- Alternate the cheeks.
- Keep it 1 to a few seconds.
- Alternate the repetitions multiple times. (5-10 times)
To make things more technical, and super accurate, a deep layer of the masseter is stronger on the dominant side, and the surface layer of the masseter muscle is stronger on the non-dominant side in general. It might not be the case in your face, because everybody's different. Anyway, the point is this masseter, regardless of which layer, is super important to stretch because this is the one that positions the jaw in asymmetrical angles. That's why you want to stretch and adjust the masseter muscles. See the dark red on the masseters on the anatomy. It is darker than the other red overworking muscles, which means masseters are stronger than the other red muscles. Blue are the sleeping muscles that you want to activate.
Warning: Try to move up 1 cheek, instead of downward.
You can do the repetitions quickly or keep each side longer (10 sec). Whichever works for you is good. The idea of this exercise is if you feel either masseter is tight, you want to do the tighter side a little bit longer to adjust. The purpose of doing this is to feel the same on both sides. I have a habit of doing this exercise very quickly, like 2 seconds, especially right after I yawn. Every time you yawn, your jaw becomes asymmetrical a bit, so it does make sense to do this movement to adjust. This is a part of our Face Posture series.
Face posture means how to move our facial muscles in better ways for daily facial activities by activating more sleeping muscles to lift up the face and relaxing overworking muscles for wrinkle reduction and sagginess. How many times do you usually yawn per day? I don’t know, but it’s a lot. So it can matter.
Every time you yawn, it's giving a big force downward. The jaw is moving to the asymmetrical side, probably toward the dominant side. That is common. That's why after you have such a big force and then close your mouth, the asymmetry stays there, which can worsen the asymmetrical muscle habit. I want to reset it. That's why I like to do this exercise from time to time. I have more tips for better yawning movement, so if you are interested, check the video.
If you want to rest even more, there's whole a lot of exercise you can do, like 3 minutes with music. Check the video.
Quick Summary
- Look straight, and move the jaw side to side, back and forth.
- Look to the right, and repeat.
- Look to the left, and repeat.
- Look down and repeat.
- Look down to the right at 45 degrees and repeat.
- Look down to the left at 45 degrees and repeat.
- Look up and repeat.
- Look up to the right at 45 degrees and repeat.
- Look up to the left at 45 degrees and repeat.
It’d be fun and easier if you did it with the music video.
The idea is the same as some spine adjustment movements that you might be already doing at the yoga studio. You lay on the mat and lightly move the spines with your head and legs up. That is to adjust the spines. I personally like the more advanced version to reset neck bones, by bending the legs all over beyond my head on the mat. Try it out if you are flexible.